I am going to use the recently published CubicleSoft File Explorer widget as the basis of this post to show the process used to create a rather complex ~8,000 line Javascript widget from scratch with no external dependencies. It took approximately 2 months to go from concept/idea to complete widget implementation with full keyboard, mouse, and touch input support that works great on desktop, tablets, and even mobile devices! There are many things I learned along the way. So while things are still fresh in my mind, I'd like to jot down and share the process involved.
The above is a live demo of the widget. Feel free to interact with it for a little bit, but don't get too distracted. There's an article to read!
Alright, the best place to start when designing a widget of this magnitude is the actual design. I used to use tools like Photoshop, Adobe XD, and even paper and pencil to mock up user interfaces. While those have some value, when designing for the web, today's web browsers already have built into them some rather amazing Developer Tools. So what happens now is:
- Create a .html file on my local computer with a bunch of divs.
- Point my web browser at the .html file.
- Open Developer Tools and pick an element out and style it in the browser.
- Once satisfied with the changes, go back to the .html file and apply those styles in a 'style' tag.
- Reload the page to make sure I didn't forget to copy any styles to the file.
- Repeat steps 3-5 until the design is mostly done.
- Load the .html file in multiple desktop browsers (e.g. Firefox, Edge, and Chrome) and fix any remaining issues.
- Test out as much keyboard and mouse interaction as is possible at this point (e.g. 'hover' and 'focus').
For this particular widget, there were five major areas to design:
- History navigation tools (fixed size)
- Current path broken down by path segment (scrollable)
- A customizable toolbar (scrollable)
- The main display area for folder and file items (scrollable)
- A status bar/information/feedback area (fixed size)
With key areas of the future user interface worked out, it is time to start making the design in the web browser. The one thing I always keep in mind at this stage is, "How can I make this widget work well on both desktop and mobile devices?" Ideally, the widget is laid out such that it is natively compatible for all widget sizes and doesn't need any Javascript to assist in that effort. Vertical scrolling is also always preferred to horizontal scrolling, especially on desktop.
In this case, you get to see the final product and intuitively know it is going to work well on all devices BUT imagine for a moment that you had not seen the widget before. It takes time to figure out what to do and can take days to plan out what the final user interface might look like. It's also important to remain semi-fluid when designing because the early design phase only accounts for 85% to 90% of the final widget's actual design.
As there are going to be various adjustments made as the widget is built, what I like to do is create outer and inner wrapper 'div's for almost everything. Using wrapper 'div's up front allows for using the browser to rapidly target CSS changes without having to mess with HTML too much. Let's see what that looks like in practical terms by using the actual design HTML that was used for this widget:
<!DOCTYPE html> <html> <meta charset="utf-8"> <meta name="viewport" content="width=device-width, initial-scale=1, maximum-scale=1" /> <head><title>CubicleSoft File Explorer Demo</title></head> <body> <style type="text/css"> body { font-family: Verdana, Arial, Helvetica, sans-serif; position: relative; color: #222222; font-size: 1.0em; } /* .fe_fileexplorer_wrap :focus { background-color: #660000 !important; } */ #test { height: 50vh; } </style> <p>Blah</p> <p>Blah</p> <p>Blah</p> <div id="test"> <div class="fe_fileexplorer_wrap"> <div class="fe_fileexplorer_dropzone_wrap"> <div class="fe_fileexplorer_inner_wrap fe_fileexplorer_inner_wrap_focused"> <div class="fe_fileexplorer_toolbar"> <div class="fe_fileexplorer_navtools"> <button class="fe_fileexplorer_navtool_back" title="Back to '...' (Alt + Left Arrow)"></button> <button class="fe_fileexplorer_navtool_forward fe_fileexplorer_disabled" title="Forward to '...' (Alt + Right Arrow)"></button> <button class="fe_fileexplorer_navtool_history" title="Recent locations"></button> <button class="fe_fileexplorer_navtool_up" title="Up to '...' (Alt + Up Arrow)"></button> </div> <div class="fe_fileexplorer_path_wrap"> <div class="fe_fileexplorer_path_icon"><div class="fe_fileexplorer_path_icon_inner"></div></div> <div class="fe_fileexplorer_path_segments_scroll_wrap"> <div class="fe_fileexplorer_path_segments_wrap"> <div class="fe_fileexplorer_path_segment_wrap"> <button class="fe_fileexplorer_path_name">Projects (/)</button> <button class="fe_fileexplorer_path_opts"></button> </div> <div class="fe_fileexplorer_path_segment_wrap"> <button class="fe_fileexplorer_path_name">2020-04-11 Transit Map (3)</button> <button class="fe_fileexplorer_path_opts"></button> </div> <div class="fe_fileexplorer_path_segment_wrap"> <button class="fe_fileexplorer_path_name">data</button> <button class="fe_fileexplorer_path_opts"></button> </div> </div> </div> </div> </div> <div class="fe_fileexplorer_body_wrap"> <div class="fe_fileexplorer_folder_tools_scroll_wrap"> <div class="fe_fileexplorer_folder_tools"> <button class="fe_fileexplorer_folder_tool_new_folder" title="New folder" tabindex="0"></button> <button class="fe_fileexplorer_folder_tool_new_file" title="New file" tabindex="-1"></button> <button class="fe_fileexplorer_folder_tool_upload" title="Upload" tabindex="-1"></button> <button class="fe_fileexplorer_folder_tool_download" title="Download" tabindex="-1"></button> <div class="fe_fileexplorer_folder_tool_separator"></div> <button class="fe_fileexplorer_folder_tool_copy fe_fileexplorer_disabled" title="Copy" tabindex="-1"></button> <button class="fe_fileexplorer_folder_tool_paste" title="Paste" tabindex="-1"></button> <button class="fe_fileexplorer_folder_tool_cut" title="Cut" tabindex="-1"></button> <button class="fe_fileexplorer_folder_tool_delete" title="Delete" tabindex="-1"></button> </div> </div> <div class="fe_fileexplorer_items_scroll_wrap"> <div class="fe_fileexplorer_items_scroll_wrap_inner"> <div class="fe_fileexplorer_items_wrap fe_fileexplorer_items_focus"> <div class="fe_fileexplorer_item_wrap"> <div class="fe_fileexplorer_item_wrap_inner" tabindex="0"> <div class="fe_fileexplorer_item_icon fe_fileexplorer_item_icon_folder"></div> <div class="fe_fileexplorer_item_text">Testing</div> </div> </div> <div class="fe_fileexplorer_item_wrap fe_fileexplorer_item_selected"> <div class="fe_fileexplorer_item_wrap_inner" tabindex="-1"> <div class="fe_fileexplorer_item_icon fe_fileexplorer_item_icon_folder"></div> <div class="fe_fileexplorer_item_text">Testing 2</div> </div> </div> <div class="fe_fileexplorer_item_wrap"> <div class="fe_fileexplorer_item_wrap_inner" tabindex="-1"> <div class="fe_fileexplorer_item_icon fe_fileexplorer_item_icon_folder"></div> <div class="fe_fileexplorer_item_text">Testing 3</div> </div> </div> <div class="fe_fileexplorer_item_wrap"> <div class="fe_fileexplorer_item_wrap_inner" tabindex="-1"> <div class="fe_fileexplorer_item_icon fe_fileexplorer_item_icon_folder"></div> <div class="fe_fileexplorer_item_text">Testing 4</div> </div> </div> <div class="fe_fileexplorer_item_wrap fe_fileexplorer_item_selected fe_fileexplorer_item_focused"> <div class="fe_fileexplorer_item_wrap_inner" tabindex="-1"> <div class="fe_fileexplorer_item_icon fe_fileexplorer_item_icon_file fe_fileexplorer_item_icon_ext_x" data-ext="XLSX"></div> <div class="fe_fileexplorer_item_text">Really_long_file_name_that_is_really,_really,_really,_long.jpg</div> </div> </div> <div class="fe_fileexplorer_item_wrap fe_fileexplorer_item_focused"> <div class="fe_fileexplorer_item_wrap_inner" tabindex="-1"> <div class="fe_fileexplorer_item_icon fe_fileexplorer_item_icon_file fe_fileexplorer_item_icon_ext_t" data-ext="TXT"></div> <div class="fe_fileexplorer_item_text">Another file.txt</div> </div> </div> <div class="fe_fileexplorer_item_wrap"> <div class="fe_fileexplorer_item_wrap_inner" tabindex="-1"> <div class="fe_fileexplorer_item_icon fe_fileexplorer_item_icon_file fe_fileexplorer_item_icon_ext_m" data-ext="MP3"></div> <div class="fe_fileexplorer_item_text">Another file.mp3</div> </div> </div> <div class="fe_fileexplorer_item_wrap"> <div class="fe_fileexplorer_item_wrap_inner" tabindex="-1"> <div class="fe_fileexplorer_item_icon fe_fileexplorer_item_icon_file fe_fileexplorer_item_icon_ext_j" data-ext="jpg"></div> <div class="fe_fileexplorer_item_text">Really long file name that is really, really, really, long.jpg</div> </div> </div> <div class="fe_fileexplorer_item_wrap"> <div class="fe_fileexplorer_item_wrap_inner" tabindex="-1"> <div class="fe_fileexplorer_item_icon fe_fileexplorer_item_icon_file fe_fileexplorer_item_icon_ext_t" data-ext="TXT"></div> <div class="fe_fileexplorer_item_text">Another file.txt</div> </div> </div> </div> </div> </div> </div> <div class="fe_fileexplorer_statusbar_wrap"> <div class="fe_fileexplorer_statusbar_text_wrap"> <div class="fe_fileexplorer_statusbar_text_segment_wrap"> 5 items </div> <div class="fe_fileexplorer_statusbar_text_segment_wrap"> 1 item selected </div> </div> <div class="fe_fileexplorer_action_wrap"> <div class="fe_fileexplorer_action_upload_wrap"> <div class="fe_fileexplorer_action_upload_msg_wrap">50 KB/s 200 KB</div> <div class="fe_fileexplorer_action_upload_msg_wrap fe_fileexplorer_action_upload_msg_wrap_last">12 u 100+ q 20 d 2 f</div> <div class="fe_fileexplorer_action_upload_cancel_wrap"></div> </div> </div> </div> </div> </div> </div> </div> <p>Blah</p> <p>Blah</p> <p>Blah</p> <p>Blah</p> <p>Blah</p> <p>Blah</p> <p>Blah</p> <p>Blah</p> <p>Blah</p> <p>Blah</p> <p>Blah</p> <p>Blah</p> <p>Blah</p> <p>Blah</p> </body> </html>
If we load that into a web browser, it looks like:

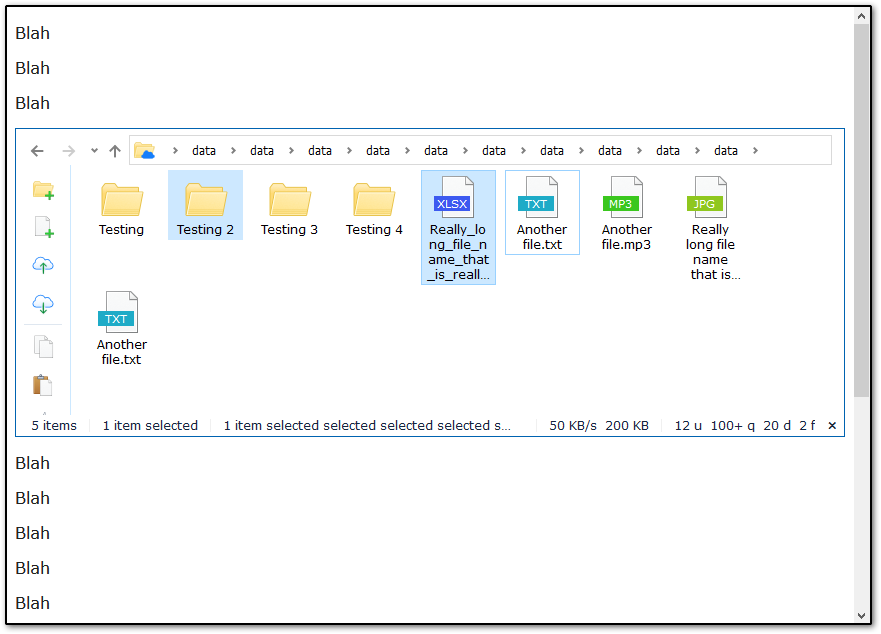
That's pretty ugly looking but the reason is due to not having any CSS styles yet. It is just HTML layout at this point. The next step is to fire up Developer Tools in the web browser, apply a few styles to one of the outermost 'div's to add a border, and then copy those styles back into the HTML once satisfied with the result. The resulting HTML now looks like:
<!DOCTYPE html> <html> <meta charset="utf-8"> <meta name="viewport" content="width=device-width, initial-scale=1, maximum-scale=1" /> <head><title>CubicleSoft File Explorer Demo</title></head> <body> <style type="text/css"> body { font-family: Verdana, Arial, Helvetica, sans-serif; position: relative; color: #222222; font-size: 1.0em; } /* .fe_fileexplorer_wrap :focus { background-color: #660000 !important; } */ #test { height: 50vh; } </style> <p>Blah</p> <p>Blah</p> <p>Blah</p> <style type="text/css"> .fe_fileexplorer_wrap .fe_fileexplorer_inner_wrap { border: 1px solid #AAAAAA; color: #000000; background-color: #FFFFFF; display: flex; flex-direction: column; height: 100%; box-sizing: border-box; } .fe_fileexplorer_wrap .fe_fileexplorer_inner_wrap.fe_fileexplorer_inner_wrap_focused { border: 1px solid #0063B1; } </style> <div id="test"> <div class="fe_fileexplorer_wrap"> <div class="fe_fileexplorer_dropzone_wrap"> <div class="fe_fileexplorer_inner_wrap fe_fileexplorer_inner_wrap_focused"> <div class="fe_fileexplorer_toolbar"> <div class="fe_fileexplorer_navtools"> <button class="fe_fileexplorer_navtool_back" title="Back to '...' (Alt + Left Arrow)"></button> <button class="fe_fileexplorer_navtool_forward fe_fileexplorer_disabled" title="Forward to '...' (Alt + Right Arrow)"></button> <button class="fe_fileexplorer_navtool_history" title="Recent locations"></button> <button class="fe_fileexplorer_navtool_up" title="Up to '...' (Alt + Up Arrow)"></button> </div> <div class="fe_fileexplorer_path_wrap"> <div class="fe_fileexplorer_path_icon"><div class="fe_fileexplorer_path_icon_inner"></div></div> <div class="fe_fileexplorer_path_segments_scroll_wrap"> <div class="fe_fileexplorer_path_segments_wrap"> <div class="fe_fileexplorer_path_segment_wrap"> <button class="fe_fileexplorer_path_name">Projects (/)</button> <button class="fe_fileexplorer_path_opts"></button> </div> <div class="fe_fileexplorer_path_segment_wrap"> <button class="fe_fileexplorer_path_name">2020-04-11 Transit Map (3)</button> <button class="fe_fileexplorer_path_opts"></button> </div> <div class="fe_fileexplorer_path_segment_wrap"> <button class="fe_fileexplorer_path_name">data</button> <button class="fe_fileexplorer_path_opts"></button> </div> </div> </div> </div> </div> <div class="fe_fileexplorer_body_wrap"> <div class="fe_fileexplorer_folder_tools_scroll_wrap"> <div class="fe_fileexplorer_folder_tools"> <button class="fe_fileexplorer_folder_tool_new_folder" title="New folder" tabindex="0"></button> <button class="fe_fileexplorer_folder_tool_new_file" title="New file" tabindex="-1"></button> <button class="fe_fileexplorer_folder_tool_upload" title="Upload" tabindex="-1"></button> <button class="fe_fileexplorer_folder_tool_download" title="Download" tabindex="-1"></button> <div class="fe_fileexplorer_folder_tool_separator"></div> <button class="fe_fileexplorer_folder_tool_copy fe_fileexplorer_disabled" title="Copy" tabindex="-1"></button> <button class="fe_fileexplorer_folder_tool_paste" title="Paste" tabindex="-1"></button> <button class="fe_fileexplorer_folder_tool_cut" title="Cut" tabindex="-1"></button> <button class="fe_fileexplorer_folder_tool_delete" title="Delete" tabindex="-1"></button> </div> </div> <div class="fe_fileexplorer_items_scroll_wrap"> <div class="fe_fileexplorer_items_scroll_wrap_inner"> <div class="fe_fileexplorer_items_wrap fe_fileexplorer_items_focus"> <div class="fe_fileexplorer_item_wrap"> <div class="fe_fileexplorer_item_wrap_inner" tabindex="0"> <div class="fe_fileexplorer_item_icon fe_fileexplorer_item_icon_folder"></div> <div class="fe_fileexplorer_item_text">Testing</div> </div> </div> <div class="fe_fileexplorer_item_wrap fe_fileexplorer_item_selected"> <div class="fe_fileexplorer_item_wrap_inner" tabindex="-1"> <div class="fe_fileexplorer_item_icon fe_fileexplorer_item_icon_folder"></div> <div class="fe_fileexplorer_item_text">Testing 2</div> </div> </div> <div class="fe_fileexplorer_item_wrap"> <div class="fe_fileexplorer_item_wrap_inner" tabindex="-1"> <div class="fe_fileexplorer_item_icon fe_fileexplorer_item_icon_folder"></div> <div class="fe_fileexplorer_item_text">Testing 3</div> </div> </div> <div class="fe_fileexplorer_item_wrap"> <div class="fe_fileexplorer_item_wrap_inner" tabindex="-1"> <div class="fe_fileexplorer_item_icon fe_fileexplorer_item_icon_folder"></div> <div class="fe_fileexplorer_item_text">Testing 4</div> </div> </div> <div class="fe_fileexplorer_item_wrap fe_fileexplorer_item_selected fe_fileexplorer_item_focused"> <div class="fe_fileexplorer_item_wrap_inner" tabindex="-1"> <div class="fe_fileexplorer_item_icon fe_fileexplorer_item_icon_file fe_fileexplorer_item_icon_ext_x" data-ext="XLSX"></div> <div class="fe_fileexplorer_item_text">Really_long_file_name_that_is_really,_really,_really,_long.jpg</div> </div> </div> <div class="fe_fileexplorer_item_wrap fe_fileexplorer_item_focused"> <div class="fe_fileexplorer_item_wrap_inner" tabindex="-1"> <div class="fe_fileexplorer_item_icon fe_fileexplorer_item_icon_file fe_fileexplorer_item_icon_ext_t" data-ext="TXT"></div> <div class="fe_fileexplorer_item_text">Another file.txt</div> </div> </div> <div class="fe_fileexplorer_item_wrap"> <div class="fe_fileexplorer_item_wrap_inner" tabindex="-1"> <div class="fe_fileexplorer_item_icon fe_fileexplorer_item_icon_file fe_fileexplorer_item_icon_ext_m" data-ext="MP3"></div> <div class="fe_fileexplorer_item_text">Another file.mp3</div> </div> </div> <div class="fe_fileexplorer_item_wrap"> <div class="fe_fileexplorer_item_wrap_inner" tabindex="-1"> <div class="fe_fileexplorer_item_icon fe_fileexplorer_item_icon_file fe_fileexplorer_item_icon_ext_j" data-ext="jpg"></div> <div class="fe_fileexplorer_item_text">Really long file name that is really, really, really, long.jpg</div> </div> </div> <div class="fe_fileexplorer_item_wrap"> <div class="fe_fileexplorer_item_wrap_inner" tabindex="-1"> <div class="fe_fileexplorer_item_icon fe_fileexplorer_item_icon_file fe_fileexplorer_item_icon_ext_t" data-ext="TXT"></div> <div class="fe_fileexplorer_item_text">Another file.txt</div> </div> </div> </div> </div> </div> </div> <div class="fe_fileexplorer_statusbar_wrap"> <div class="fe_fileexplorer_statusbar_text_wrap"> <div class="fe_fileexplorer_statusbar_text_segment_wrap"> 5 items </div> <div class="fe_fileexplorer_statusbar_text_segment_wrap"> 1 item selected </div> </div> <div class="fe_fileexplorer_action_wrap"> <div class="fe_fileexplorer_action_upload_wrap"> <div class="fe_fileexplorer_action_upload_msg_wrap">50 KB/s 200 KB</div> <div class="fe_fileexplorer_action_upload_msg_wrap fe_fileexplorer_action_upload_msg_wrap_last">12 u 100+ q 20 d 2 f</div> <div class="fe_fileexplorer_action_upload_cancel_wrap"></div> </div> </div> </div> </div> </div> </div> </div> <p>Blah</p> <p>Blah</p> <p>Blah</p> <p>Blah</p> <p>Blah</p> <p>Blah</p> <p>Blah</p> <p>Blah</p> <p>Blah</p> <p>Blah</p> <p>Blah</p> <p>Blah</p> <p>Blah</p> <p>Blah</p> </body> </html>
Which now looks like:

Okay...this is going to take a while. Styling up the entire widget in this case, including designing icons, took about 40 hours. Here's a rough timelapse of the process (click the image to view the whole animation):
However, I don't know exactly how long it took to get the design done. This sort of thing takes as long as it takes. But if I had to guess, each step of the design process took an average of 20-ish minutes to complete in real time.
Some portions of the design obviously took longer than others such as doing research on how to hide a horizontal overflow scrollbar for the path segments or containing flex items to a scrolling region or finding existing icons for the toolbar or even creating icons from scratch. Icon design and the numerous complexities that arise, especially when making icons that are smaller than 32x32 pixels, is its own topic for another day. A single icon for a specialized situation can even take an entire week to create.
During the design process, I made sure to test various extremes:
- What does it look like if there is a really long status bar item?
- What happens if there are 50+ path segments?
- What happens if the widget is smaller than the toolbar?
- Does the widget always fill its space?
- What happens if there are 1,000+ items in the main area?
- No items in the main area?
- And so on.
The goal here was to work out as many issues in HTML + CSS up front before writing any Javascript.
Toward the end of the animation is a keyboard navigation test. I set the background color to an ugly red so I could actually see where the keyboard focus currently was. Obviously, that hideous red color isn't in the final widget. The goal was to make sure tab key navigation on a keyboard going through the widget would make sense. It actually takes a while to figure out good tab key navigation options for a widget like this and experience has taught me that it is best to do it up-front rather than to try to bolt it on later.
One side-note: You may notice an extra wrapper 'div' with a class of 'fe_fileexplorer_dropzone' and are wondering what that is for. That was a very early attempt to plan ahead for future drag-and-drop operations. Specifically, dragging and dropping files from the desktop to start uploading files. The original plan was to use the dropzone with jQuery File Upload like what was used for the jQuery Fancy File Uploader widget. However, once I got to actually writing the upload portion in the actual widget, I ended up NOT using jQuery File Upload for various reasons. As a result, the dropzone div still exists in the final widget but is actually unused. Always plan ahead a little but not care too much if there is an extra leftover wrapper div here or there later on. There are much bigger fish to fry when building a widget like this.
Okay, one more side-note: The timelapse animation is fake. WHAT??!!! [Outrage ensues in the comments] Yup. I made the timelapse after completing the whole widget, including all 7,500+ lines of Javascript. The timelapse was created by loading the static HTML, which didn't really change much after the design phase, plus the final CSS into the browser, disabling all of the styles, and then re-enabling styles and taking screenshots in roughly the same order I remember designing the widget. So it's close to what I remember actually happening, but it's probably not exact. Even if you feel slightly cheated, it's still a really neat animation.
Interactivity Planning Phase
All that has been done to this point is the design. There is no Javascript and no interactivity other than applying styles to hover and element focus. I don't like writing code until the design portion of a widget is basically done. The reason for doing that allows for determining what is actually possible layout-wise before I invest a bunch of time in writing code that won't work or have to refactor to deal with either browser-specific issues or changes in the design. There was still some minor refactoring here and there during development, but it would have been a lot more had the Javascript been started on right away.
So let's move onto the next step and start planning the interactivity bits. The five major components interact with each other either through direct function calls or indirectly through the custom events system. An example of these interactions is:
- Double-click/tap on a folder.
- A SetPath() call is made to load a new path.
- The current path segment bar is updated to reflect the new path by rebuilding path segments.
- Existing folder/file items are removed from the view.
- If the folder is already mapped, those items are loaded. Otherwise a loading screen is displayed.
- The history stack is updated to point at the new path.
- The history tools are notified that navigation took place so they can update their visual appearance.
- The toolbar tools are notified to update so they can enable/disable themselves accordingly.
- The status bar handler is notified to update what it is displaying.
- A refresh of the current folder is triggered so that a backend server can load an updated item list.
As shown above, changing folders requires all five major areas to be updated in some fashion. When two components interact with each other, the complexity of the code increases exponentially. When complexity increases, the important thing to do is to pace oneself and move at a continual, steady pace knowing it will take a while to complete but it will eventually get done. Keeping a list of bite-sized tasks helps too where no single task takes longer than a day or two to complete. Constant little victories helps to keep morale high and slowly adds up to a completed project.
Not operating under a deadline is ideal too - the stress of a deadline can lead to early coding mistakes that can be costly or even impossible to correct later. Not having a deadline allows for sufficient time to do the necessary research to decide on the best approach to solving various problems that will inevitably arise. Note that a no-deadline approach only works for highly self-motivated individuals.
Since the history navigation tools were just mentioned and while I'm thinking about it: If there is going to be "undo/redo" or "history navigation" in a piece of software, it is the single most important thing to get right up-front because everything else about the software will revolve around some portion of the undo stack/history tracker. Attempting to bolt an undo/redo stack onto a piece of software after the fact is usually extremely difficult if not impossible.
In general, there will be a pointer to a specific undo/history item and all of the rest of the code in the software will look at that one item. For this particular widget, I keep a 'currfolder' pointer to the current folder and all of the rest of the code looks at 'currfolder' to know what folder is currently being viewed by the user.
A Brief Detour: Closures
Before going too far and getting a whole lot of folks lost, let's take a brief detour into Javascript closures. Without some basic knowledge, you'll be lost as we deep-dive into some code samples from the widget. You don't have to fully understand what happens in a Javascript closure but just understand the highlights of what is happening.
When most people write Javascript for the first time, they'll write something like this:
<script type="text/javascript">
var nextid = 1;

function TheTestFunction()
{
 var result = nextid;

 nextid++;

 return result;
}

console.log(TheTestFunction());
console.log(TheTestFunction());
</script>
The code above places a function into the global namespace on the window. Referencing the function or global is easy: Simply call TheTestFunction() which is an alias for window.TheTestFunction(). Well, that's not so bad. But what if you have 100 functions like this? 1,000? If you control every aspect of the current document, you can avoid things like name collisions, but imagine if there are 50 different pieces of software from 15 different domains all competing in the global namespace? And what happens if the web browser itself starts using those names too? It can become a mess really fast.
Note: I use 'var' instead of 'let' and various "old school" techniques mostly because I learned Javascript in the 1990's and old habits die hard. I also prefer typeless languages over strongly typed, which allows me to focus on actually making the application rather than making the application work. Those are personal preferences based on decades of experience. But you do you.
By the way, there's nothing wrong with using the global namespace for small applications. It's there to be used. Encapsulation inside a closure is really only required when building a library/widget that will be used elsewhere (i.e. what this post is talking about) or security and/or potential name conflicts are of concern. Other than those things, as long as the application works and doesn't have security vulnerabilities, then it's totally fine to use the global namespace. Anywho...back to closures.
A Javascript closure is an anonymous function with two big features: Variable and function isolation. So let's look at the same code from above but in a closure this time:
<script type="text/javascript">
(function() {
 var nextid = 1;

 function TheTestFunction()
 {
  var result = nextid;

  nextid++;

  return result;
 }
})();

// These next two lines will raise errors in the console:
console.log(TheTestFunction());
console.log(TheTestFunction());
</script>
The syntax is weird to look at. It basically says to create an anonymous function with zero parameters and then immediately execute it. Inside the function is the original function that gets defined as well but it is local to the anonymous function. The window object remains unaffected. This allows for lots of functions and variables and code to be fully encapsulated in a single closure. Of course, this creates a new problem: How do we get functions to be accessible to the outside world? The answer is to selectively export to the window object.
<script type="text/javascript">
(function() {
 var nextid = 1;

 function TheTestFunction()
 {
  var result = nextid;

  nextid++;

  return result;
 }

 function SomeOtherFunction()
 {
  console.log('Other function!');
 }

 window.TheTestFunction = TheTestFunction;

 window.TheTestFunction.AnotherFunction = SomeOtherFunction;

})();

// It works again!
console.log(TheTestFunction());
console.log(TheTestFunction());

TheTestFunction.AnotherFunction();
</script>
Here we can see that the function is once again being exported to the window and also exported a new function to the function being exported. Javascript is weird in that most things are effectively modifiable objects. Whether or not abusing this particular feature of functions is good practice is up for debate but doing so can allow for a really clean global namespace with just one or two exports of very complex widgets.
Okay, now that the basics are out of the way, let's make a function intended to utilize the 'new' keyword:<script type="text/javascript"> (function() { var nextid = 1; var TheTestFunction = function() { if (!(this instanceof TheTestFunction)) return new TheTestFunction(); var myid = nextid; nextid++; var $this = this; $this.GetID = function() { return myid; }; } var SomeOtherFunction = function() { console.log('Other function!'); } window.TheTestFunction = TheTestFunction; window.TheTestFunction.AnotherFunction = SomeOtherFunction; })(); // Another closure. (function() { var myinst = new TheTestFunction(); // Whoopsie! Forgot to call new but the first line of the function itself automatically fixes this. var myinst2 = TheTestFunction(); console.log(myinst.GetID()); console.log(myinst2.GetID()); TheTestFunction.AnotherFunction(); })(); </script>
The new code above creates two instances of the exported function. Each instance gets its own internal variables and 'this' pointer. The 'this' pointer is saved to '$this' for later self-reference (useful for more complex classes) and creates a function attached to the instance that returns the internal ID value of the instance. It is starting to behave a bit like a class in other languages. However, this "class" also has full access to all of the variables in the closure that it sits in. I use the term "class" loosely because Javascript traditionally does not have classes (although that is changing a little with some syntactic sugar in modern browsers).
If everything above makes some sense, then we are ready to move onto looking at a more involved class.
A Real Class: DebounceAttributes
A good first class to look at from this widget is the DebounceAttributes class. If you've ever used a classic debounce/throttle Javascript function before, this idea may sound familiar but DebounceAttributes is for very efficiently deboucing/throttling on object and attribute changes instead of re-dispatching untimely DOM events and making many expensive clearTimeout()/setTimeout() calls.
<script type="text/javascript">
(function() {
 var DebounceAttributes = function(options) {
  if (!(this instanceof DebounceAttributes))  return new DebounceAttributes(options);

  var intervaltimer = null, numsame;
  var $this = this;

  var defaults = {
   watchers: [],
   interval: 50,
   stopsame: 1,

   callback: null,
   intervalcallback: null
  };

  $this.settings = Object.assign({}, defaults, options);

  var MainIntervalHandler = function() {
   var nummatches = 0;

   for (var x = 0; x < $this.settings.watchers.length; x++)
   {
    var watcher = $this.settings.watchers[x];

    if (watcher.val === watcher.elem[watcher.attr])  nummatches++;
    else  watcher.val = watcher.elem[watcher.attr];
   }

   if (nummatches < $this.settings.watchers.length)
   {
    numsame = 0;

    if ($this.settings.intervalcallback)  $this.settings.intervalcallback.call($this);
   }
   else
   {
    numsame++;

    if (numsame >= $this.settings.stopsame)
    {
     $this.Stop();

     if ($this.settings.intervalcallback)  $this.settings.intervalcallback.call($this);

     if ($this.settings.callback)  $this.settings.callback.call($this);
    }
   }
  };


  // Public functions.

  $this.Start = function() {
   if (!intervaltimer)
   {
    numsame = 0;

    intervaltimer = setInterval(MainIntervalHandler, $this.settings.interval);
   }
  };

  $this.Stop = function() {
   if (intervaltimer)
   {
    clearInterval(intervaltimer);

    intervaltimer = null;
   }
  };

  $this.Destroy = function() {
   $this.Stop();

   $this = null;
  }
 };

 window.DebounceAttributes = DebounceAttributes;
})();

// Another closure.
(function() {
 var ThumbnailQueueUpdate = function() {
console.log('Update!');
 };

 // Code swiped from the FileExplorer class.
 var thumbnailscrollwatch = new DebounceAttributes({
  watchers: [
   { elem: elems.itemsscrollwrap, attr: 'scrollTop', val: -1 },
   { elem: elems.itemsscrollwrapinner, attr: 'clientWidth', val: -1 }
  ],
  interval: 50,
  stopsame: 10,
  callback: ThumbnailQueueUpdate
 });

 elems.itemsscrollwrap.addEventListener('scroll', thumbnailscrollwatch.Start);
 window.addEventListener('resize', thumbnailscrollwatch.Start, true);
})();
</script>
You may have noticed in the live demo from earlier that there was a slight delay between scrolling and when thumbnail images started loading into the view. That intentional delay is the DebounceAttributes class at work. The widget waits until after scrolling stops for a moment and then starts loading the thumbnails. Using a class here is quite useful because the Start() function can be made very efficient: If the interval timer already exists, the function ends up doing nothing when the 'scroll' event fires the callback on the class instance.
Every time the interval fires, the attributes are compared to their previous values. When they are the exact same for a certain, specified number of times, the interval stops and the callback function runs.
There is an interesting object in the DebounceAttributes class: '$this.settings'. This variable makes a public merged settings object with the defaults object and the options object. The approach normalizes an object so that all keys at least exist in the final object and also makes it easier to identify what all of the possible options are at a glance.
There is one private function that is defined with a 'var' instead of a more traditional 'function MyFunctionName()' approach. Technically, it doesn't really matter. I prefer assignment like this in case I later decide I want a specific function to be public instead of private. The 'var' vs. '$this.' prefix decides whether the function is private or public.
There are also a number of public functions but the last one is interesting: $this.Destroy(). The Destroy() function immediately cleans up any running bits and then destroys itself. The idea here is to convince the browser during its next garbage collection cycle that the object is no longer in use and to free up the associated RAM. The downside is that Destroy() functions can be tricky to get right AND can be several screens long for large, complex widgets.
Note: When referencing a public function from inside a function, it is important to use '$this.FunctionName(...)' instead of 'this.FunctionName(...)' because by the time the function runs, 'this' may be in a completely different context. The private '$this' variable keeps track of the original 'this' context from when the class was instantiated.
While the DebounceAttributes class is a complete class in and of itself and certainly reusable in lots of other projects, the goal of this section is to show the general structure of a fairly good class design. Having a good class structure will aid in constructing complex Javascript widgets in a sensible fashion without having to resort to using transpilers like CoffeeScript or TypeScript.
For anyone curious about the first line of code in DebounceAttributes or TheTestFunction() from the previous section, it verifies that it is: Called with the 'new' keyword so it won't affect the global namespace and, slightly more advanced, makes the class not inheritable on the prototype. There is still a way to get the function to do the wrong thing via call()/apply() and forcing an instance of itself to run in its own context, but the point is to not wind up dumping garbage into the global namespace and to also explicitly deny class inheritance.
Class inheritance is rather broken-by-design in Javascript anyway - ES6 classes are just syntactic sugar placed on top of the overall brokenness. There's a generally better approach anyway to dealing with the issue of inheritance by decoupling classes via private custom events.
Private Custom Events
In the past, event handling in web browsers was limited to one callback per event type (onclick/onmousemove/etc.) on each DOM node. When a little library called jQuery came along, it also brought the ability to easily apply multiple callbacks to a single DOM node event type. For that and many, many other reasons including call chaining, a powerful DOM selection engine, and plugins, jQuery became extremely popular. Eventually, all major web browsers adopted a similar model with addEventListener() and removeEventListener() functions along with many of the other features found in jQuery, which made things better for everyone.
When making multiple classes, an event model allows the classes to remain loosely coupled with each other instead of going down a class inheritance path. This allows a class to be aware that something might be interested in knowing about a specific event happening without having to have precise knowledge about those somethings.
There are two approaches to custom events: Public via the DOM and private via a custom implementation. Public custom events can be useful but anyone can trigger them and requires a DOM node to use them, and callbacks are limited to receiving an Event object instance as a single parameter.
Private custom events, on the other hand, allow for greater control over what can trigger them, there is no risk of events having name collisions, they do not require a DOM node to function, can run callbacks with as many parameters as desired, and precisely control what 'this' should be in the callback. Here is what I use in my classes:
 // Internal functions.
 var DispatchEvent = function(eventname, params) {
  if (!triggers[eventname])  return;

  triggers[eventname].forEach(function(callback) {
   if (Array.isArray(params))  callback.apply($this, params);
   else  callback.call($this, params);
  });
 };

 // Public DOM-style functions.
 $this.addEventListener = function(eventname, callback) {
  if (!triggers[eventname])  triggers[eventname] = [];

  for (var x in triggers[eventname])
  {
   if (triggers[eventname][x] === callback)  return;
  }

  triggers[eventname].push(callback);
 };

 $this.removeEventListener = function(eventname, callback) {
  if (!triggers[eventname])  return;

  for (var x in triggers[eventname])
  {
   if (triggers[eventname][x] === callback)
   {
    triggers[eventname].splice(x, 1);

    return;
   }
  }
 };

 $this.hasEventListener = function(eventname) {
  return (triggers[eventname] && triggers[eventname].length);
 };
This approach allows various interested parties to register for specific events. When those events fire, callbacks receive sensible parameter lists, and 'this' references the object instance. Dispatching an event from within the class is easy:
 DispatchEvent('open_file', [currfolder, entry]);

 DispatchEvent('update_upload_fileinfo', fileinfo);
Then it becomes a matter of documenting the parameters for the callback function for each emitted event. But I tend to write fairly extensive documentation for my software.
For this widget, it needed to know in some places if a specific event had at least one handler before doing something like marking the current folder as "Busy" or adding a tool to the toolbar. If there were no listeners for a 'delete' event, the current folder would effectively "freeze" whenever the user pressed 'Delete'. The hasEventListener() function lets the code detect if there is at least one listener for the specific event before proceeding to enable the current folder's busy state.
The widget also needed to allow asynchronous operations to fully handle the dispatched event exactly one time. This was accomplished by using an internal variable inside a callback function (aka a closure) kind of like this:
 ondone: function(val, lastelem, etype) {
  var $this2 = this;

  var calledback = false;
  var renamecallback = function(newentry) {
   if (calledback || destroyinprogress)  return;

   calledback = true;

   // Do stuff to finalize the rename...
  };

  $this.StartOperationIndicator();

  $this.SetNamedStatusBarText('message', EscapeHTML(FormatStr($this.Translate('Renaming "{0}" to "{1}"...'), origentry.name, val)), $this.settings.messagetimeout);

  // Creates a copy of the original entry to pass to the rename event handler.
  DispatchEvent('rename', [renamecallback, currfolder, Object.assign({}, origentry), val]);
 }
Renaming a folder or file, for example, dispatches the 'rename' event to all registered callbacks with a callback function (renamecallback()) as the first parameter. The first callback to call the renamecallback() callback is the only one that is accepted and processed by using a private boolean variable called 'calledback' to track if the renamecallback() function has been called before, which allows any additional callbacks to renamecallback() to be ignored. (Does your brain hurt from reading that? Imagine how many times I had to proofread it.)
For most use-cases of the widget, there will only be at most one registered listener, but this approach avoids potentially unfortunate situations AND allows for complex scenarios of multiple resource providers being attached to the same widget - only the provider who is associated with an item would pick up and handle the request for that item while the rest of the listeners would ignore the event.
Creating DOM Nodes
In a complex widget, several DOM nodes will eventually need to be created. For this, I use a simple but effective CreateNode() function in the main closure:
 var CreateNode = function(tag, classes, attrs, styles) {
  var elem = document.createElement(tag);

  if (classes)
  {
   if (typeof classes === 'string')  elem.className = classes;
   else  elem.className = classes.join(' ');
  }

  if (attrs)  Object.assign(elem, attrs);

  if (styles)  Object.assign(elem.style, styles);

  return elem;
 };
The CreateNode() function is used to quickly generate private 'elems' arrays like this one:
 var PopupMenu = function(parentelem, options) {
  if (!(this instanceof PopupMenu))  return new PopupMenu(parentelem, options);

  // ...

  // Initialize the UI elements.
  var elems = {
   popupwrap: CreateNode('div', ['fe_fileexplorer_popup_wrap'], { tabIndex: 0 }),
   innerwrap: CreateNode('div', ['fe_fileexplorer_popup_inner_wrap'])
  };

  // ...

  elems.popupwrap.appendChild(elems.innerwrap);

  parentelem.appendChild(elems.popupwrap);

  // ...
 };
The PopupMenu class creates a mini popup-menu for the Recent Locations and path segment areas of the widget. I like to attach elements from the deepest leaf nodes to the parent nodes and finally attach the top level node to the parent DOM element. Building the nodes separately from the live DOM won't trigger a reflow, which is an expensive operation. Also, building from the deepest children up to the parent helps to avoid missing various nodes during the attachChild() phase.
When creating a DOM node, the type of the node used will dictate how aggressively styling has to be applied. For instance, using a 'button' for a button makes sense but buttons are difficult to style properly. Using a real button means fighting against both a user's CSS on the page as well as web browser defaults. However, browsers also include a lot of nice built-in functionality for standard elements (i.e. various events for mouse, keyboard, and touch like click handling, native screen reader support, and more).
On the other hand, custom 'div' elements are easy to target and style with CSS but extra Javascript is required to handle them properly and won't necessarily work as well with software such as screen readers.
The tradeoffs are really dependent on mood and fit. If something is very clearly a button, make it a 'button' element or clearly an input field, make it an 'input' field. If it is not as obvious, then decide on how much effort needs to be expended to shoehorn an existing element in and what the likelihood is that someone else's CSS styles will mess up the UI. Which brings us to the topic, which is browser testing.
Cross-Browser Testing
When building a custom Javascript widget, be sure to test in all major web browsers. I generally develop in Firefox and test regularly in Google Chrome, Microsoft Edge, Android Chrome, and sometimes desktop Safari. (iOS is distinctly missing as I don't own any iOS devices due to their prohibitive cost - I usually have to ask other people to try something out.) Each browser is just different enough that even standard things are not consistent.
An example of this is the 'button' element. Firefox tends to show a dotted outline around focused button elements and Google Chrome tends to show a blue glow around buttons. Both issues can be overridden with a little CSS, but without cross-browser testing, the widget would look fine in one browser and a bit strange in another instead of presenting a consistent user experience across all browsers. This, of course, doesn't even cover a situation where someone globally styles all button elements on their webpage to do something weird like rotate them 5 degrees.
Besides styles, one of the most important areas of cross-browser testing is dealing with obvious hacks. As an example, I spent a rather considerable amount of time figuring out how to get right-click clipboard cut, copy, and paste operations to work equally well across all three major desktop browsers for the widget. Firefox was the most permissive - allowing cut/copy/paste events pretty much everywhere (yay!). But then I discovered that Chrome was the most restrictive and only allows those events in editable elements that have focus (boo!). Edge only blocked events until a paste happened in a editable element somewhere on the page and then stopped blocking them altogether (probably an unintentional bug, but also: boo!).
I tried various things, including a mildly comical but totally disastrous attempt to use "contenteditable". The final, working solution involved setting up a hidden-ish textarea that overlays the main area but only "shows" on right-click and temporarily forces keyboard focus into it. The textarea, when "visible," is fully transparent and all text in the textarea is rendered invisible. Unfortunately, Edge made life difficult by still showing a blinking keyboard caret on the screen and Chrome liked to show selection areas.

The solution to both problems was to shrink the font to 1px and enlarge the textarea to a few pixels outside the top of the widget's main area where various stuff could "show" to its heart's content but the "overflow: hidden" on the parent caused it to magically disappear. Is this hack awesome? Yes. Could it break in the future? Absolutely.
In short, that was/is all one giant hack to get the right-click menu to use the browser's built-in clipboard handlers. Bouncing between three different browsers was the only way to see if it was working properly everywhere.
Various other areas that required significant cross-browser testing included: The horizontal/vertical scrolling path segment bar, drag-and-drop (this was a mess all on its own), hardware capture of the back/forward buttons on the mouse (that still doesn't work quite right), keyboard navigation (mostly to check CSS styles), keyboard shortcuts, selection box variable scroll speed (click to draw a selection box around items but go outside the main area of the widget), upload cancelling, and plenty of other things I've forgotten about already.
Always try to test in as close to a production environment as possible/makes sense. Even throwing in fake delays using setTimeout() of 250ms or greater where the user's browser might talk to a web server or WebSocket server can reveal significant weaknesses that wouldn't otherwise show up. While nothing beats a real, live, production environment, saving larger Javascript files to a remote host can waste significant amounts of time.
This widget, in particular, weighs in at 225KB+ unminified, ungzipped. It takes a couple of moments to transfer that file to a remote host for every little change, so developing it locally saved me quite a bit of time but did exclude broader browser testing until closer to the end of the first dev cycle. I had my hands full anyway with just the major desktop browsers.
Handling Keyboard, Mouse, and Touch
There are three major forms of device input to consider when building a Javascript widget: Keyboard, mouse, and touchscreen. I'm a keyboard and mouse person. I'll bounce between the keyboard and the mouse depending on which device is closest at hand and which device makes the most sense to use. Each device has its own strengths and limitations.
Keyboards make it easier to type in words and sentences and apply modifiers to other device actions (e.g. Ctrl + click). They aren't super great at navigating great distances in a document even with dedicated keys for the purpose such as Page Up and Page Down and are even worse at horizontal scrolling. Also, when navigating with a keyboard, many things can be considered "modal", which adds an interesting challenge.
Mice make it easier to scroll vertically great distances as well as accurately place a cursor at a specific position on the screen. They are extremely cumbersome to use for any kind of data entry but make up for that by being able to rapidly change focus to different areas of a user interface. Most mice have three buttons (left, right, middle click) but some mice also have more buttons than that (e.g. back and forward). Users who can use both a keyboard + mouse are always more efficient at navigating a user interface than those who can only use a single input method for whatever reason.
Touchscreens are relatively new to web development. They've technically always been around but were always kind of clunky and not widely used until several advancements were made to the technology and smartphones subsequently brought them to the forefront of web application design. A touchscreen is somewhat like a mouse, but far less accurate. Mobile web browsers attempt to simulate mouse events, which can go a long way to making mouse-driven interfaces work okay on touch devices. Users need extra space around elements and/or the elements themselves to be larger than a finger to be comfortable to use. Both vertical and horizontal scrolling are equally easy to do using a touchscreen but vertical scrolling is still strongly preferred because horizontal swiping may already be used for something else (e.g. opening a menu or changing views). Multi-touch events are also possible but may not be intuitive to the user. Text entry is usually accomplished with a virtual keyboard that will resize and scroll the browser.
A Javascript widget should work well for all three major input device types. The simplest way to make that happen is to make sure all major functionality is accessible to users who can only use each device by itself. And each device should ideally support more than one way to accomplish the same task. An example of this within this widget is various ways to select one or more items in the main area of the widget:
- Keyboard: Arrow keys without modifiers to navigate and select one item. Also supports Ctrl + arrow keys to navigate without selecting anything and then Ctrl + spacebar to select/deselect individual items. Shift + arrow keys to select from an anchor point. Ctrl + A to select all. Type in a filename to go directly to and select the filename. Optional toolbar icon to enable/disable checkboxes for spacebar multiselect.
- Mouse: Scroll through the items list using the scrollwheel. Click + drag in an open space to select multiple items using a selection box. Click on a single item to select it. Optional toolbar icon to enable/disable checkboxes for mouse-only multiselect. The mouse handlers in this widget also support keyboard modifiers (Ctrl and Shift) for multiple item selection.
- Touch: Scroll through the items naturally with touch + drag. Tap to select an item. Tap a checkbox to start a multiselect operation. Double-tap in open space to deselect all. Triple-tap in open space to select all.
That example covers just one device interaction experience with the widget.
In addition, each major web browser may handle device inputs slightly differently, so it is important to test cross-browser interactions. Keyboard shortcuts are a big one to test to make sure the web browser isn't already using the shortcut for something else or that odd behaviors don't happen. For example, Ctrl + F (or Meta + F on Mac OSX) usually opens a Find box and the browser may or may not deliver that keydown event to Javascript handlers.
The overall goal should be to create device-sensitive experiences for the user that are intuitive and provide powerful functionality as if just one device input type were the only thing available. Speaking of which, let's talk a little about web accessibility for Javascript widgets.
Getting ADA-compliant
The Americans with Disabilities Act (ADA) basically says that those with physical disabilities should have equal access to the same resources that those who are not disabled have and then follows up with a hefty fine schedule for active non-compliance (up to $75,000 USD for the first violation and up to $150,000 for subsequent violations). The definition of a disability is fairly broad, but for websites, this mostly means being able to navigate through a whole webpage with a single device.
While enforcement of ADA against website operators has been fairly sporadic, it's generally pretty rude to exclude people...and both you and I are just one minor freak accident from losing the mobility of a hand or arm. And we'll probably start losing our eyesight as we age too and need additional help from various assistive technologies. I once worked in the same office with someone who was nearly blind and they navigated the web with a specialized device that blew up the portion of the screen they were looking at so that only a couple of very large words could be seen at a time (approximately 1000% zoom - Firefox maxes out at 300% zoom).
Enter the concept of accessible software. On the surface, we want to make sure our widgets reach the broadest possible audience of users. The reality is that, unless we already use assistive technologies like NV Access because we need to, we aren't really prepared for the culture shock that goes with those technologies.
Screen readers are the primary thought behind most accessibility efforts but that only addresses one people group - those with vision impairment. How vision impaired users use screen readers is more akin to reading and understanding the raw HTML in View Source at 4x speed all day, every day. That's not something the vast majority of web developers are used to.
In the specific case of Javascript widgets, the easiest starting point is be sure that Tab and Shift + Tab and arrow key navigation make sense and that the user can both enter, exit, and use the widget fully with the keyboard. Tab key support is pretty easy to add by specifying a 'tabIndex' of 0. However, that's really just the tip of the iceberg.
Another thing to do is make sure every operation has multiple methods for accomplishing the same task. Some users will find it physically easier to use one method over another even if a particular method is less efficient. For example, a user might prefer using the Paste toolbar option in this widget on a desktop browser because it makes more sense to them and/or a browser plugin makes it easier to paste specific content while the vast majority of users will either right-click + Paste or use Ctrl + V on the keyboard as shortcuts in desktop browsers.
Accessible Rich Internet Applications, or ARIA (or WAI-ARIA), supposedly allows for applications and widgets to enable better understanding of what is going on in an active interface. However, to be perfectly honest, I don't know what I need to do to even get started for this widget in particular (See GitHub issue). I've read several guides, including MDN's official guide to ARIA, and they are all about as clear as mud when it comes to widget design + ARIA on the scale, scope, and complexity of this widget. ARIA for Javascript widgets is the wall a lot of people hit and then give up on.
It's actually possible to, without proper direction, make an experience worse for users who use assistive technologies by improperly implementing ARIA attributes. What needs to happen is have an actual user of relevant technologies supply critical, continuous feedback on whether things are better or worse as adjustments are made to a widget or interface.
Enabling Multilingual Support
Another aspect to accessibility is native language/multilingual/il8n support (il8n = internationalization). Many speakers/readers can only understand one or two languages. Generic, easily recognizeable icons can go a long way to allowing for more intuitive interactions but nothing says, "You speak my language" quite like actually speaking the language. Enabling a Javascript widget for internationalization support is the first step of many to being able to reach a global audience.
A good first implementation is to allow for language packs to be created. A language pack provides a set of direct string mappings from the source language to the target language. For this widget, I'm using a semi-rudimentary system via the options object to the FileExplorer class called 'langmap' and a function called Translate():
options = {
 langmap: {
  'Hello': 'Hola'
 }
};

// Inside the FileExplorer class.
defaults = {
 // ...
 langmap: {}
};

$this.settings = Object.assign({}, defaults, options);

$this.Translate = function(str) {
 return ($this.settings.langmap[str] ? $this.settings.langmap[str] : str);
};

console.log($this.Translate('Hello'));
Translate() is a really simple function that gets called anywhere in the code that uses a string in English that will be emitted to the DOM. If it finds a matching string in langmap, it will use that string instead of the English language string. A translator making a language pack just needs to look for Translate calls in the code and create suitable mapping strings in an object.
But let's say you want to translate a dynamically generated string such as, "Selected 5 out of 10 items." We could do something along the lines of, "Selected %u out of %u items." with a classic sprintf()-style string handler. However, that forces the order of the 5 before the 10. In some languages, it might be more correct to present to the reader the 10 before the 5. For example, a literal translation from another language back into rough English might produce, "Items total 10 with 5 selected." A better solution is to use a formatted string with positional numerical tokens:
var FormatStr = function(format) {
 var args = Array.prototype.slice.call(arguments, 1);

 return format.replace(/{(\d+)}/g, function(match, number) {
  return (typeof args[number] != 'undefined' ? args[number] : match);
 });
};

console.log(FormatStr($this.Translate('Selected {0} out of {1} items.'), 5, 10));
The FormatStr() function takes the output of Translate() and replaces tokens in the string with dynamic values. There is still some room for language-specific oddities to crop up such as comma vs. period when displaying large numbers, calendar dates, etc. However, Translate() and FormatStr() covers the vast majority of translation issues and also makes it easier to write widget code in the native language of the author.
A more traditional method is to use a placeholder value like "selected_items_count" and then map that string to a language string. The downside is that every language then requires a language pack and is more tedious to design the widget in the first place. Both approaches have pros and cons.
There are other considerations beyond string mappings and dynamic string generation when integrating multilingual support. One of those is left-to-right (LTR) vs. right-to-left (RTL) reading order. Many Middle Eastern languages (e.g. Arabic, Hebrew, Urdu), read and expect right-to-left user interfaces pretty much exclusively. A few other languages also used to be fairly RTL-heavy, but many people who read/write those languages have become used to seeing and reading in either direction these days, so it doesn't matter as much and, in some cases, LTR is preferred. In RTL mode, most things are flipped horizontally but there can be a mixture of RTL + LTR. Browsers can do most of the heavy lifting here with a few well-placed 'dir' attribute indicators. It helps to have someone who reads and speaks the language to provide good insight. RTL support can cause a variety of layout issues, so be prepared to possibly rewrite some code.
Another multilingual consideration has significant impact on the actual design of the widget itself: Words have different lengths in different languages and some words don't have a good, direct translation and may require additional words to clarify meaning. In general, assume that a single string will probably fit fine on one line and could wrap but that there will be display issues if two separate strings are placed onto the same line even in different columns (odd wrapping or cutoffs resulting in a variety of alignment issues). This doesn't mean you can't put multiple strings onto a single line, just be aware that multilingual-related issues with line length might crop up when doing so.
One more multilingual consideration is not related to words but icons. An icon with a word or even a letter in it is a translator's nightmare but even fully graphical icons may have a sufficiently different meaning in different cultures. For example, I once had a conversation with someone in the United Kingdom (UK) about the use of a padlock as a security icon. Their own cultural worldview was that padlocks offered little to no actual security and so the padlock icon did not equate to security in their mind based on their own local culture's perspective. This shows that even a well-recognized, purely graphical icon may not convey the intended or same meaning across cultures even within the same language group.
This is a huge topic that is virtually inexhaustible but those are some key highlight areas. In my opinion, as long as support exists in a widget to build a language pack that enables the widget to show 95% to 98% of all strings in a different language, then that's an excellent first step. The Translate() and FormatStr() functions also make it fairly easy to adopt such an approach.
Security Considerations
Closures do a lot to secure a widget's internals from outside actors. Anything inside a closure is directly inaccessible to outside actors.
What do I mean by "outside actor"? There are many threat vectors but the biggest threat vector is the Javascript code that runs on any given page. For example, a lot of websites use Google Analytics to get page view statistics for their website. Let's say a page loads Google Analytics' Javascript in the browser...
Now, here's the big question: Can you 1000% guarantee that Google doesn't alter its Javascript to extract the user's information from the web page to send to their servers for certain users? They have the ability and capability to do so and if you use their code, you are giving them unfettered access to anything your user does on your pages. This isn't to throw Google under the bus but rather to make a point about webpage security. Or, rather, the lack thereof.
In my experience, the average website loads code from about 15 different domains. Anything other than that which is served directly from your own domain and code that you wrote yourself (or have independently vetted) is not secure. Period.
Now let's say you load the FileExplorer class and go to use it. How can you guarantee that you are calling the real window.FileExplorer() vs. a hacker's version of it? Javascript makes it easy to replace any function with another function:
<script type="text/javascript" src="file-explorer/file-explorer.js"></script>

...

<script type="text/javascript">
(function() {
 var HackerInterceptFunction = function(parentelem, options) {
console.log('Hacked!');
 };

 window.FileExplorer = HackerInterceptFunction;
})();
</script>

...

<script type="text/javascript">
(function() {
 var fe = new FileExplorer(elem, options);
})();
</script>
The takeaway here is that on sensitive pages, don't load unnecessary Javascript code. However, when loading extra stuff on sensitive pages, be sure the sensitive stuff is loaded and used before loading less critical Javascript bits. Even then, there is no guarantee that an attacker won't inject code to modify the DOM to intercept and alter various actions.
When building widgets like this one that will have access to sensitive server-side stuff such as file data and folders, it is also a good idea to take advantage of 'isTrusted' in keyboard, mouse, and touch event handlers. For instance, an attacker who gains access to the page could, for example, send simulated 'Ctrl + A' and 'Delete' keystrokes to the widget to automatically select all of items and then delete them. Fortunately, the browser will set 'isTrusted' to false for simulated events and true for real keyboard/mouse/touch events (with some exceptions for some browser extensions that the user specifically installed).
Other Tips
These are some additional tips that didn't really fit in anywhere else.
Don't be afraid to refactor anything at any point. That includes right up to release. For example, I wound up refactoring the status bar progress area almost last-minute because I realized that copy operations could potentially take quite a while. It hadn't come up during testing because I only simulated a 250ms delay and was primarily focused on getting clipboard copy/paste to work properly. I ended up grabbing most of the code for the file upload status bar and making it more generic and reusable. It took a few hours to refactor the code and then test to verify that I didn't break the uploader in the process of refactoring. Then I was able to reuse the refactored code to provide progress feedback during long copy operations.
Don't do a MVP if it can be avoided. The MVP, or Minimally Viable Product, can work fine for a complete application that receives regular, frequent updates. However, widgets and libraries, in my opinion, really need to be feature-complete and fully tested before going out the door. Nothing's worse than finding a widget or library that looks good on the surface but doesn't actually function properly, wasting lots of time shoehorning it into a solution.
Write your own great documentation after finishing the software but before releasing it. I've caught countless coding mistakes/errors over the years by doing this. I'll look at a piece of code while documenting it and say, "Huh. That's weird." And then realize it's a bug and then go and fix it and then come back and finish writing the documentation for it. It's that last extra pass over the code that really solidifies the software long before it enters the user's hands. Plus I get good documentation I can point users at, which automatically eliminates 95% of all of the support issues that arise.
Export enough useful functions/events. If I think my users might want to do something specific even if I don't initially plan on using that particular feature myself, I'll still export a potentially useful function or emit a custom event for it. Doing so saves me from dealing with a feature request from a user later on. I also find myself irregularly using the extra features myself.
Consider progressive enhancement early on. Progressive enhancement starts with an existing HTML element like a form 'input type="file"' element and converts it into a fancier version (e.g. jQuery Fancy File Uploader). Widgets that apply the principle of progressive enhancement generally do just one thing slightly better and don't require Javascript to be enabled for the webpage to still function. This widget, in particular, does more than one thing and there is no direct native element equivalent to fall back on, making simple feature parity without Javascript rather difficult to pull off. It could be partially replicated in an iframe and a lot of extra server-side code, but would lose a lot of the elegance of the widget (no drag-and-drop, no bulk mouse selections, no keyboard shortcuts, etc).
Conclusion
If you are looking to build a large, complex widget in Javascript, I hope this post provides a broad overview of a number of important topics to consider during development. New widgets should be broadly accessible across a wide range of browsers, devices, and OSes. They should be capable of handling an international audience through language mapping and support those with disabilities by, at a minimum, making sure navigation with all input devices has equal parity. Finally, widgets and any associated server backends should be made secure from bad actors who will attempt to subvert security of the widget and/or the server through a number of different mechanisms.
Comments
Post a Comment